
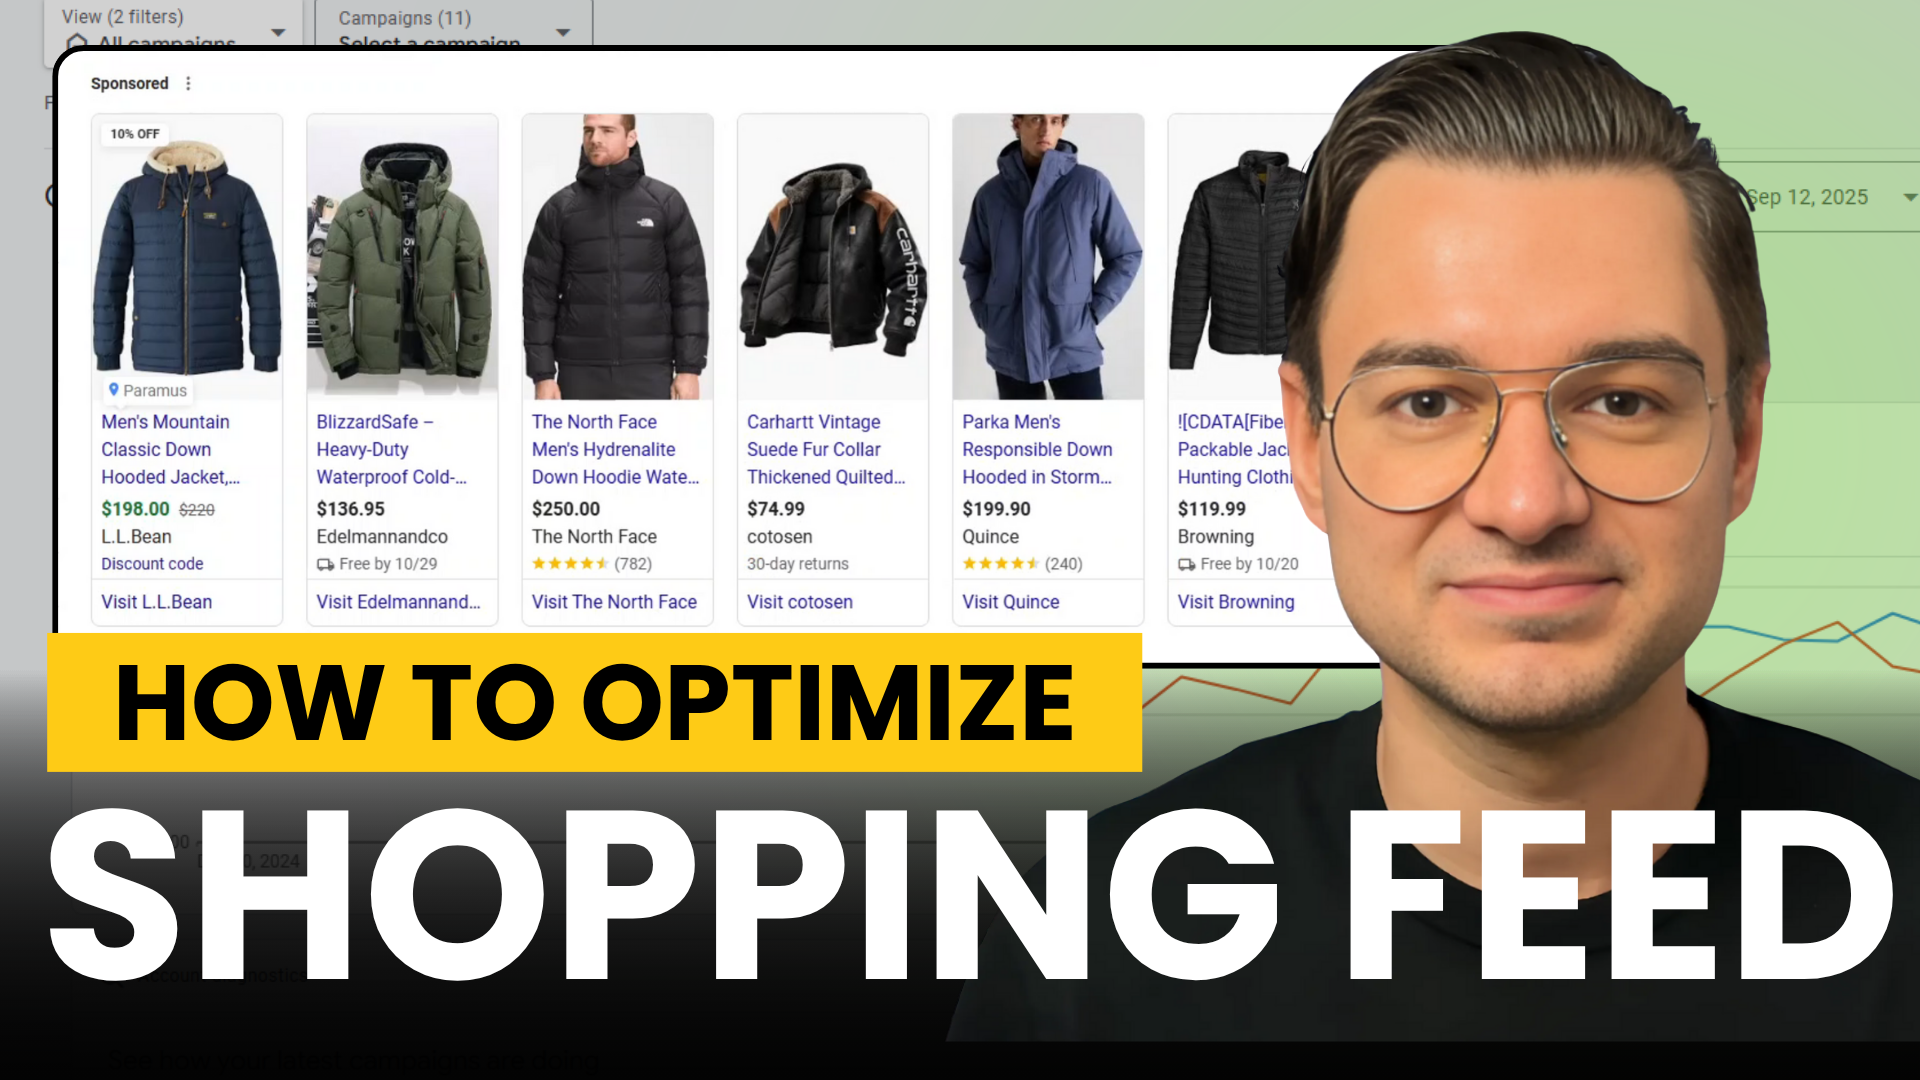
If you’ve ever wondered why your Shopping or Performance Max campaigns aren’t delivering the results you expected, the problem might not be your bidding strategy or your campaign structure—it could be your Merchant Center feed.
Your Merchant Center setup is the foundation of everything when it comes to Shopping placements, but many advertisers completely overlook it.
So in this post, I’m going to walk you through the most critical Merchant Center optimizations that will actually move the needle on your performance. We at ROImonks have audited dozens of Merchant Center accounts, and we’ve compiled every single attribute, metric, and optimization into a comprehensive checklist with all our agency-tested tips and direct links to Google’s support articles.
In this post, I’m focusing on the absolute essentials—the highest-priority items that have the biggest impact on your results. But if you want the full checklist with every attribute, every pro tip, and every optimization we’ve tested, we’ve made it available for free.

If you prefer a video format, you can check out my video on the topic here:
Alright, without further or due, let’s dive into it!
THE BIG THREE: TITLE, PRICE, AND IMAGE
Let’s start with what I call “The Big Three”—the three attributes that have more impact on your success than everything else combined: Title, Price, and Image.
TITLE
Your product title is one of the most visible elements of your ad or free listing, and it’s absolutely critical for getting your products in front of the right users. If I had to pick one attribute to spend the most time optimizing, this would be it.

Now, the foundation of a great title starts with making sure each one is unique and specific. You don’t want duplicate titles across your products because that makes it harder for Google to understand what makes each product different, and it confuses users too. Every product should have its own clear, descriptive title that tells people exactly what they’re looking at.
But here’s where most people mess up: they just guess what words to put in their titles. Don’t do that. Instead, dive into your Search Term Report and use Keyword Planner to see what people are actually typing into Google when they’re searching for products like yours. This is huge. Once you know what terms have the highest search volume, those are the words you need to be incorporating into your titles, and you want to put them at the front. The highest search volume terms usually matter most to users, so lead with those.
Think about it this way: when someone’s making a purchase decision, what factors actually matter to them? Is it the brand? The material? The color? The size? So, in addition to search volume research, you should talk to your support or sales team and ask them what drives purchase decisions for your customers. Whatever that key factor is, put it at the very beginning of your title so people see it immediately.
Beyond that, you want to be specific about the distinguishing details for each variant. If you’re selling a t-shirt, don’t just say “T-shirt” in the title—include the color, the size, the gender it’s designed for, the age group if relevant. These details matter, especially when they’re important decision factors for your customers. And keep promotional text out of your titles completely—no “SALE” or “50% OFF” or “Free Shipping” or anything like that.
Now, when it comes to your brand name, there’s a strategic choice to make. If the brand is actually a differentiating factor—like if you’re selling Rolex watches or Nike sneakers where the brand drives the purchase—absolutely include it. But for more generic products where the brand doesn’t really influence the buying decision, you’re better off using that space for more descriptive information about the product itself.
The key to managing all of this at scale is creating a title formula for each product category and then sticking to it consistently across your entire feed. So if you sell apparel, you might decide your formula is: Product Type + Color + Size + Gender and so on. If you sell electronics, it might be: Brand + Model + Key Spec + Color and so on. Whatever formula makes sense for your products, apply it everywhere. This keeps everything organized, makes your feed look professional, and makes it way easier to manage as you scale.
And don’t leave characters on the table. You can use up to 150 characters in your titles, so use them. Longer, more detailed titles perform better than short, vague ones because they give Google and users more information to work with. Just make sure everything stays professional and grammatically correct—no ALL CAPS for emphasis, no weird symbols, no unnecessary characters. Keep it clean and clear.
PRICES
Now let’s talk about pricing, because this is where a lot of people struggle. Here’s the brutal truth: competitive pricing is the number one driver of success on Shopping placements. You can have perfect titles and amazing images, but if your pricing isn’t competitive, people will scroll right past your products.
Think about it from your customer’s perspective. When someone sees Shopping ads, they’re not just looking at your product in isolation—they’re seeing your product next to three, four, five other similar products, all lined up with their prices displayed right there. And what’s the first thing people do? They scan for the best deal. It’s human nature. Even if someone isn’t necessarily looking for the cheapest option, they’re still price-conscious. They want to feel like they’re getting good value and making a smart purchase, so if your price is noticeably higher than everyone else’s without a clear reason why, they’re just going to move on to the next listing.
That’s why you need to regularly conduct competitor pricing analysis. I’m talking about actually looking at what your competitors are charging, not just setting your prices and hoping for the best. And look, I’m not saying you need to be the cheapest—but you need to be competitive within your market. If everyone else is selling a similar product for $50 and you’re at $75, you better have a really good reason why, and that reason better be communicated clearly in your product listing.

Now, here’s something that can really boost your performance: the sale price attribute. If you’re running a promotion, use it. What happens is during a sale, the sale price becomes the displayed price. But here’s the best part—if both your original price and sale price meet Google’s requirements, users will actually see both prices. They’ll see the original price crossed out and the sale price highlighted right next to it. This instantly shows them the discount they’re getting, and psychologically, that’s massive for conversions. People love seeing that they’re getting a deal.
IMAGES
Your image is what catches the eye. It’s literally the first thing someone sees when they’re scrolling through products, so it needs to be good. Not just okay—good.
In fact, the quality of your images is directly correlated with user engagement and clicks. And this isn’t subjective—it’s based on real data. So submit the largest, highest-resolution image you have. Google allows up to 64 megapixels and 16 MB per image, and they recommend at least 1,500 by 1,500 pixels. Don’t submit some tiny, pixelated image that looks like it was taken with a phone from the early 2010s and expect people to click on it.
But it’s not just about the main image. You also want to provide additional images using the additional image link attribute. Include at least three more images per product beyond your main image. Show different angles, zoom in on important details, include lifestyle images showing the product being used. This helps shoppers actually visualize what they’re buying and builds confidence that your product is exactly what they’re looking for.
When you’re setting up your images, make sure the product is clearly displayed and takes up most of the frame. We’re talking about 75% to 90% of the image space. Not so zoomed in that you can’t tell what it is, but not so far away that the product looks tiny. And keep your staging minimal—the product needs to be the hero here, not fancy background or props.
Consistency matters too. Use uniform aspect ratios and a consistent cropping strategy across your entire feed. When someone is looking at multiple products from your store, having a consistent visual style makes everything look more professional and trustworthy. It’s a subtle thing, but it makes a difference.
And here’s something a lot of people don’t do: test different image types. Try different angles, try different backgrounds. What works best will depend on your specific products and your specific audience, so you need to test and see what drives higher click-through rates and ROAS for your products.
DESCRIPTION: NOT AS IMPORTANT AS YOU THINK
Okay, let’s talk about product descriptions, and I’m going to be honest with you about this: descriptions are not nearly as important as titles. Most people will never even read your descriptions. So if you’re spending hours crafting the perfect description for every product while your titles are mediocre, you’ve got your priorities backwards.
That said, descriptions do still matter, especially for Google’s algorithm. Google uses your description to understand what your product is and to match it with relevant search queries. So you can’t just ignore it completely.
But don’t just copy-paste your title into the description. That’s lazy and it doesn’t give Google any additional information to work with. Instead, use those same search terms you identified for your title, but expand on them. Describe the product in a way that helps Google understand all the different ways someone might search for it.
Similarly to titles, make sure to front-load the important stuff when it comes to your descriptions as well. You can include up to 5,000 characters in your description, but put the most important details in the first 160 to 500 characters because that’s what Google prioritizes. Describe all the relevant features—size, material, model, texture, shape, age range, and whatever applies to your product.
But here’s what you shouldn’t do: don’t describe other products. Don’t talk about compatible accessories or similar items you sell. Don’t include comparisons like “even better than X.” Don’t write about your company’s history or include promotional text. Just describe the product itself. That’s it.
And just like with your titles, you want to create a description formula and stick to it. Keep everything professional and grammatically correct. No weird symbols, no ALL CAPS for emphasis, just clear, professional product descriptions.
THE BACKEND STUFF THAT ACTUALLY MATTERS
Now let’s get into some of the backend optimizations that can seriously move the needle but that most people completely ignore.
PRODUCT RATINGS
Alright, so when people are browsing through Google Shopping or looking at your ads, one of the first things that catches their eye—besides your image and price—is those little star ratings sitting right underneath your product. So someone sees your product, and immediately they can see “oh, this has 4.5 stars with 127 reviews”—that’s instant social proof.
Here’s the thing: if you have product ratings showing, you’re at a massive advantage. If you don’t, you’re at a disadvantage. When someone’s comparing products and they see yours without ratings next to three other products that all have star ratings, which one do you think looks more trustworthy?
Now, to get product ratings showing on your listings, you need to share your product reviews with Google. There are a couple of ways to do this. You can express interest directly through Google’s form to participate in their Product Ratings program, or you can work with one of their approved review aggregators—companies like Trustpilot, Yotpo, or similar platforms that Google recognizes and pulls review data from.
There is a threshold you need to hit though. You need a minimum of 50 reviews total across all your products for ratings to start showing. And individual products need at least 3 reviews before Google will display ratings for that specific product. So if you’re just starting out and don’t have many reviews yet, focus on collecting them—this is one of those investments that pays off significantly once you hit those thresholds.
RETURN POLICY
Let’s talk about return policies. When you’re setting up your product data in the Merchant Center, you have the option to provide information about your return and refund policies. It’s not mandatory, you’re not going to get disapproved if you don’t include it. But here’s why you absolutely should: return policy information shows up on your ads, on your free listings, and even in Gmail when people are looking at your products.
Think about it from the customer’s perspective again. Someone’s about to spend $50, $100, maybe $500 on a product from a store they might not know. One of the biggest objections running through their mind is “what if I don’t like it?” or “what if it doesn’t fit?” or “what if it’s not what I expected?” If they can see right there in your ad that you offer 30-day returns or 60-day returns or whatever your policy is, that removes a huge barrier to clicking and buying.
Return policy is a key factor for people making purchasing decisions, and showing it prominently in your ads can significantly improve your click-through rates and conversions. People feel safer buying when they know they have options if something goes wrong.
Now, another big optimization item here is that your return policy needs to be competitive within your industry. You don’t necessarily need the longest return window or the most generous terms, but you need to be in the ballpark of what your competitors offer. If everyone in your industry offers 90-day returns and you’re only offering 14 days, that’s going to hurt you. Conversely, if you can offer something better—that can become a competitive advantage.
And you’ve got flexibility in how you apply return policies. You can set one return policy at the account level that applies to all your products. Or if you have different categories of products that need different return terms—you can create multiple return policies and use the return policy label attribute to assign specific products to specific policies. This gives you the control to handle different scenarios without making everything complicated.
CONVERSIONS WITH CART DATA
Next, let’s talk about Conversions with Cart Data as it is one of the most overlooked optimizations I see in audits, and it’s absolutely critical for e-commerce. So let me explain what Conversions with Cart Data actually is and why it matters.
Conversions with Cart Data is an extension to your standard Google Ads conversion tracking. It’s something you need to set up in addition to your regular purchase conversion tracking. And once it’s enabled and someone completes a purchase on your website, your conversion tracking doesn’t just tell Google “a purchase happened”—it sends detailed product-level information as well. Which specific products were in the cart, how many of each, the individual prices of each item, all of that detail gets passed back to Google Ads.
Why does this matter? Let me put it this way: you can absolutely track conversion values without Cart Data. Basic conversion tracking already does that—it can tell Google “this purchase was worth $150” by passing the total order value. That works fine for understanding overall revenue and ROAS at a campaign level.
But here’s what basic conversion tracking can’t tell Google: what made up that $150 purchase. Was it one expensive item? Three cheaper items? Which specific products were in that order? Did someone click on an ad for a hat but actually bought shoes and a jacket instead?
That’s the game-changer with Cart Data. Instead of just seeing “$150 purchase,” Google now sees “Product A for $50, Product B for $75, and Product C for $25.” And because those product IDs match back to your Merchant Center feed, Google knows exactly which products from your catalog are performing, which products lead to bigger purchases, which products get bought together, all of it.
Essentially, Google takes those product IDs from the cart data and matches them against the products in your Merchant Center feed. And because your Google Ads account is linked to your Merchant Center account, Google Ads can now understand exactly which products from your catalog were purchased. This connection between the cart data, your Merchant Center feed, and your Google Ads account is what makes this whole system work.
This level of detail unlocks way more sophisticated optimization. Google can identify patterns like which products drive the most cross-sells, which audiences buy which specific products, which product ads lead to bigger cart sizes.
Getting this set up is technical work, so you’ll need to involve your developer. They’ll need to modify your conversion tracking to pass this product-level data. If you want the step-by-step on implementation, Google has detailed guides in their support documentation, but that’s beyond the scope of what we’re covering here.
What you do need to know is this: you need a high cart match rate. It measures how successfully Google can match the product IDs being sent from your website back to the product IDs in your Merchant Center feed.

To check your cart match rate, go into Google Ads, navigate to Goals, then Conversions, then Summary. Find your primary purchase conversion event, hover over the status column, and click Diagnostics. You’ll see your match rate and any issues Google has detected.
If your match rate is low, (meaning under 75%) your purchased products aren’t getting matched with your feed, which means you’re losing all that valuable product-level data. Google can’t see which specific products are driving sales, can’t optimize for the right products, can’t identify cross-sell patterns—you’re basically back to just knowing “a purchase happened” without any of the intelligence that makes Cart Data powerful in the first place. So you need to fix this.
The first thing to check—and honestly the easiest fix—is making sure you’ve added every product from your website to your Merchant Center feed. If you’re selling something on your site that’s not in your feed, Google has nothing to match it against, so it just shows up as an unmatched product. And, if you have a massive catalog and can’t realistically add everything, at least make sure all your best sellers and main products are in the feed so you’re getting matches on the majority of your purchases.
Once you’ve verified all your products are in the feed, then check for ID mismatches. Sometimes the product IDs on your website don’t match the IDs in your feed exactly. Maybe your site uses “SKU-12345” in uppercase but your feed has “sku-12345” with lowercase letters, or there are extra spaces or dashes that don’t align. These tiny differences break the matching. Get your developer to audit this and make sure the IDs match exactly—character for character, case for case—between your feed and your e-commerce platform.
This is worth getting right because the optimization power you get from proper Cart Data implementation is massive.
SHIPPING
Shipping information can genuinely make or break a purchase decision. When someone’s looking at your product, they want to know two things: how much is it going to cost to ship, and when am I going to get it?
Most importantly and why I added shipping to this optimization list is because you better make sure your shipping is competitive—both the cost and the speed. If you’re charging $15 for shipping and your competitor is offering free shipping, you’re at a disadvantage. If you’re quoting 7-10 business days and someone else is offering 2-3 day shipping, that’s a problem. You don’t necessarily need to be the fastest or cheapest, but you need to be competitive.
And here’s another tip: if you can, set up estimated delivery dates so people see an “arrives by” date instead of just “3-5 business days.” Seeing a specific date like “arrives by October 12” removes uncertainty and makes the purchase feel more concrete.
You’ve got options for how to set up shipping in Merchant Center. You can configure it at the account level. This creates your baseline shipping rules that apply to all products. Or you can use the shipping attribute at the product level to override those account settings for specific products that need different shipping terms.
Generally, it makes more sense to build your shipping rules in your account settings and only use the product-level attribute when you need exceptions. Like maybe most of your products ship ground, but you’ve got a few oversized items that require freight shipping. Handle the exceptions at the product level, but build your foundation at the account level.
A FEW MORE QUICK WINS
Let me touch on a few other optimizations that can have a significant impact if they apply to your business.
First, If you have physical stores, Local Inventory Ads are absolutely worth setting up as they can give you a powerful advantage in capturing “near me” intent. Essentially, they allow you to showcase your store’s in-stock products in Google results for nearby shoppers. The data shows that retailers using local inventory ads see a 21% increase in store visits and a 9% increase in online conversions for products that are available in store. That’s substantial.
You can even take advantage of features like “Pickup Today”, “Pick up later”, “Curbside pickup” and so on, to add those little labels to your Local Inventory Ads to also capture customers who need your product today.
Second, if your products have GTINs (or Global Trade Item Numbers) but you haven’t added them, do it now. Products with valid GTINs are eligible for richer ad placements and typically see up to 40% higher impressions because Google can more accurately match them to user queries and product knowledge graphs.
If a GTIN doesn’t exist (like for custom or handmade items), make sure you still provide both mpn (manufacturer part number) and brand. This strengthens your product identity and helps Google’s matching algorithm.
Next, check your Product Type attribute. Make sure every product has one defined, and don’t stop at a single category. Add product type depth—at least three levels deep if possible, like Apparel > Workwear > Jackets > Winter Jackets. This gives Google clearer context for how your catalog is structured but be careful: changing product_type can break existing product-level segmentation in your campaigns, and adding depth can alter product targeting behavior. So, implement gradually, monitor impact, and be ready to roll back if it hurts your targeting.
Next, use Custom Labels strategically. Custom labels 0 through 4 are one of the most underused levers in Shopping and Performance Max campaigns, but they are extremely useful for organizing your listing or product groups in your campaigns. Essentially, they allow you to tag certain products like your best-sellers or highest margin products, so you can easily segment them and bid on them separately in Google Ads. This will also help you simplify your product-level reporting, as you will be able to see aggregated data for each custom label, like for example you will be able to see how much you spent on your best-sellers specifically or how much revenue these products delivered.
Finally, if you’re selling apparel or accessories, you need to make sure that your product’s color, age group, gender, and size attributes are filled accurately. These allow users to filter products and narrow down search results to find exactly what they’re looking for. If someone wants a blue t-shirt in size large for men, those attributes need to be there so Google can show them your product. If you have a massive feed, a helpful tip is to use feed rules to extract this information from your titles and descriptions if it’s not already in a separate attribute.
WRAPPING IT UP
So that’s the essential Merchant Center optimization checklist.
Remember, everything I just covered comes from the comprehensive checklist we put together. It includes every attribute, all the agency-tested tips, and direct links to Google’s support documentation. It’s completely free—just grab it from the link in the description and use it as your reference guide whenever you’re optimizing your Merchant Center.

Leave a Reply